
In this article, we will show you two methods of calculating the number of working days between two dates in Power BI.
The first method is to use the NETWORKDAYS DAX function and a table to exclude public holidays.
The second method uses a calendar table with your public holidays table and the DATESBETWEEN DAX function.
If you want to calculate the difference between dates in Power Query or the difference between dates in Power BI (not working days) then we have written separate guides for these.
Method 1: Use NETWORKDAYS DAX function
This first method is the quickest way to calculate the number of working days between two dates in Power BI.
If you want to discount public holidays from your calculation then you need to follow both steps. However, if you just want to know the number of weekdays between two dates then you can skip straight to step two.
This uses NETWORKDAYS and allows you to exclude holidays.
Step 1: Create a public holidays table
The first step is to create a holidays table in Power BI.
You can do this by creating one in excel and then importing to your Power BI report, if this will be easier to update.
Or, like we have done in this example, you can click ‘Enter Data’ on the top ribbon and enter the dates manually.
The dates you enter must be all public holidays between the earliest date and the latest date you are calculating working days between.
In our example, we want to know the number of working days between May 5th 2020 and December 12th 2022. Therefore we have listed all public holidays since 2020.
Here is a website you can use to find a list of public holidays in the USA.
Here is our public holidays table in Power BI:

Step 2: Use NETWORKDAYS DAX function
The next step is to create a custom column and use the NETWORKDAYS DAX function.
The syntax for NETWORKDAYS is:
NETWORKDAYS(Start Date, End Date, Weekend, Holidays)For the weekend part of the function, you will generally want to use ‘1’ since this discounts Saturdays and Sundays and leaves you with working days of Monday through Friday.
Then we use the holidays table we have created in the Holidays part of the function to tell it what days to exclude in the count.
Here is our example formula using NETWORKDAYS:
Working Days = NETWORKDAYS(Staff[Date Started],Staff[Date Left],1,'Public Holidays')Here is our custom column result:

Method 2: Use a Calendar and DATESBETWEEN DAX function
This method is similar to the first method except uses a calendar table to mark each day to exclude from the count.
It can give you more control over specific days to exclude.
Step 1: Create a public holidays table
As in the first method, create a public holidays table in your Power BI report.
Refer to step one in the first method for all the details on how to complete this.
Step 2: Create a calendar table
After you have created a public holidays table, now create another table in Power BI for your calendar.
To do this, navigate to the Modeling tab in the top ribbon and click ‘New Table’.
Use the following DAX code to create a calendar table between the earliest start date and the latest end date you require for your count.
Calendar = CALENDAR(DATE(2020,1,1),DATE(2023,12,31))We are using the same example from the first method so we need the calendar to cover the period May 5th 2020 and December 12th 2022.
For simplicity, we have gone from the start of 2020 to the end of 2023.
Step 3: Add weekday, holiday and working day columns
Next, you need to add three new columns to your calendar table using DAX.
First, a weekday column to return the corresponding days of the week for each date, in numerical form.
Here is the DAX you will need to add this column:
Weekday = WEEKDAY('Calendar'[Date])Secondly, a holiday column is required to return a result when a date also appears on our public holidays table.
Here is the DAX you will need to add this column:
Holiday = CALCULATE(COUNTROWS('Public Holidays'),FILTER('Public Holidays','Public Holidays'[Date] = EARLIER('Calendar'[Date])))Lastly, a column is required to return a result if the date is a work day. This is when the date is not a Saturday or Sunday or a public holiday. We use the Weekday and Holiday columns we have just created to calculate this.
Here is the DAX you will need to add this column:
Is Work Day = IF(OR('Calendar'[Weekday]=1,'Calendar'[Weekday]=7),0,IF(ISBLANK('Calendar'[Holiday]),1,0))In our Is Work Day column, we return a 1 if the date is a work day and 0 if it is a Saturday, Sunday or public holiday.
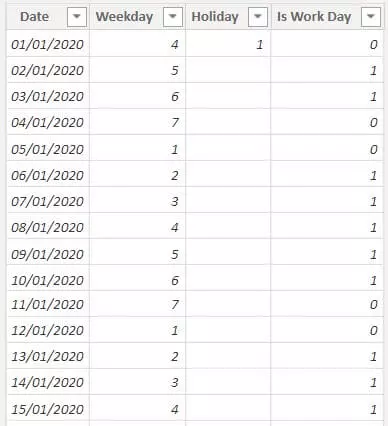
See below for the final result:
Step 4: Use DATESBETWEEN DAX function
The final step is to use the Calendar table we have modified to count the number of working days between two dates.
To do this, we need to count the rows in the table where the date is a work day, between the start and the end dates.
Create a custom column in the table with your start and end dates.
In our example, this is the DAX formula we have used to calculate the number of working days between the Date Started and Date left.
Working Days = CALCULATE(

    COUNTROWS('Calendar'),
    FILTER('Calendar','Calendar'[Is Work Day] = 1),
    DATESBETWEEN('Calendar'[Date],Staff[Date Started],'Staff'[Date Left]))
This returns exactly the same result as the table from method one.
Thank you so much for this! I’d been afraid I was going to have to reinvent the wheel, but this is so nice.
Thanks for your feedback. Glad we could help.