In this article, we will show you how to send an item to the back or front of your Power BI report.
If you are having issues with ‘send to back’ in Power BI, we also cover solutions using the ‘selection’ pane and ‘maintain layer order’ options.
Power BI send to back
In Power BI you can choose visuals, shapes, buttons and text boxes to ‘send to back’ which means they will appear behind all other items.
Each item in your report is described as a layer and when you send an item to the back, it becomes the last layer of your report.
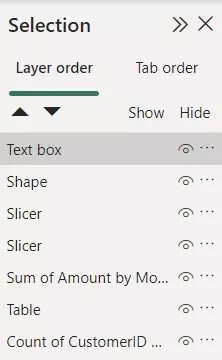
You can view the layer order (which items will appear before another if they are on top of each other) in the Selection pane.
To send a visual, shape, button or text box to the back of your Power BI report, you need to:
- Click on the item to select it
- A new tab should appear on the top ribbon called ‘Format’. Click on this
- Click the drop down on the ‘Send backward’ button and then select ‘Send to back’
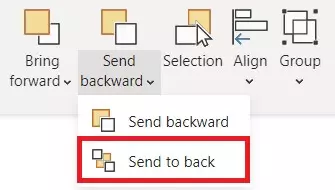
If you don’t want to send a visual to the very back of your layer order – perhaps you want it to be in the middle of two other items – you can use the ‘send backward’ option instead of ‘send to back’ and this will move it down one layer order instead of to the very bottom.
An alternative way to ‘send to back’ is by using the Selection pane. Here’s how:
- Click on the ‘View’ tab in the top ribbon
- Click the ‘Selection’ button which will open up the Selection pane on the right hand side of your report
- Find the visual/button/shape/text box in the layer order and drag it to the bottom of the order
Power BI send to front
Send to front in Power BI is the opposite of send to back.
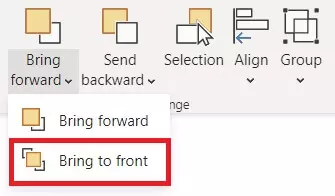
If you want to bring an items to the forefront of your report over others (i.e. make it top of the layer order), then you can use the send to front button.
Like the send to back button, it is found in the Format section, which appears after you have selected the item in your report.
Click the ‘bring forward’ drop down and select ‘send to front’.
Solutions to ‘send to back’ not working in Power BI
If your ‘send to back’ is not working in Power BI, you can try the following solutions:
Use the selection pane to change the layer order.
To make an item in your Power BI report go to the back, it needs to be last in the layer order.
You can open the selection pane and drag the item to the bottom of the layer order to ensure it is the last layer in the report.
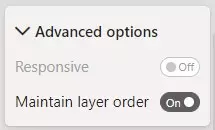
To ensure that your item stays at the bottom, once you are happy with your layer order, navigate to the Visualizations pane > General > Properties > Advanced options and then select ‘Maintain layer order‘.
This will hold the layer order in place for your selected items.
If you are having trouble with multiple items appearing at the bottom of your layer order, another feature you can utilize is the ability to group items in Power BI.
Select the items in the layer order you want to group using the Ctrl button on your keyboard, click the ellipsis in the selection pane, and select Group.
This allows you to group items together and then move them all to the bottom of your layer order.

