
In this article, we will show you how to replace values in multiple columns in Power Query using two different methods.
Method 1 is best if you want to replace one value in multiple columns.
Method 2 is best if you want to replace multiple values in multiple columns.
Method 1: Select multiple columns and replace values
Here is the example data we’re working with:
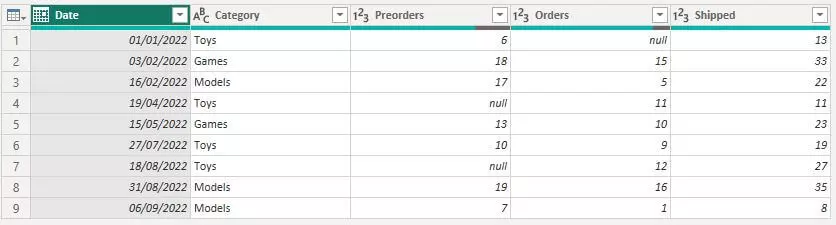
It is fictional sales data with the amount of preorders, orders and shipped items.
We want to replace nulls in the last three columns with the number 0.
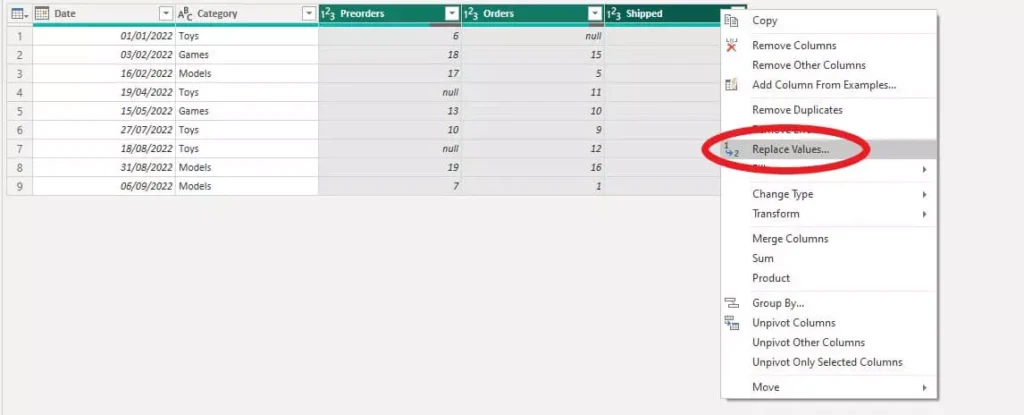
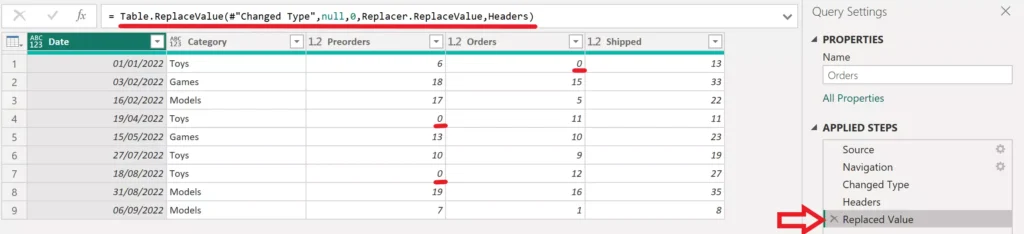
Step 1: Highlight columns and replace values
To replace the nulls in all three columns in one go, select the columns (click + ctrl), right click and select ‘Relace Values’ as shown circled in red below.
Then, enter the value you want to find (in this case, null) and the value you want to replace with (in this case, 0).
After you have done this, the columns you selected will have found and replaced the values you specified.
In the example below, the nulls have been replaced with zeros:
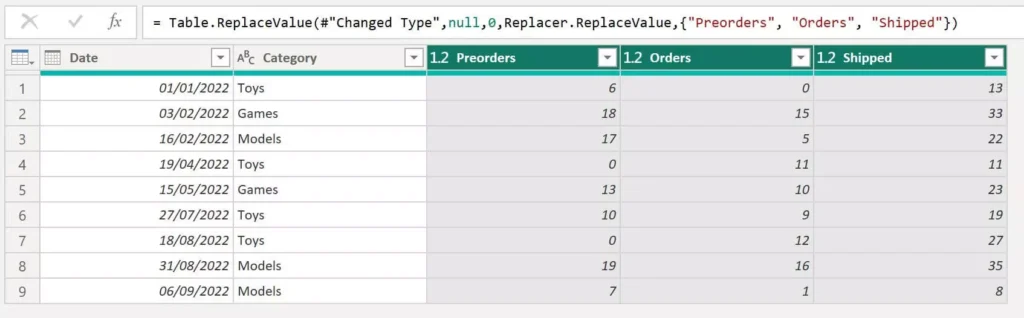
This is the M code from the last step in the example:
= Table.ReplaceValue(#"Changed Type",null,0,Replacer.ReplaceValue,{"Preorders", "Orders", "Shipped"})Step 2 (Optional): Add a headers list
Now, if you have a data source where extra columns could be added in the future, and you want to find and replace the same values in these too, then here is a method you can use to do this.
Before replacing values, we must create a new step.
Use the fx button in Power Query to create a step, and type:
= Table.ColumnNames([Previous Step])Change [Previous Step] to the name of the previous step in your query.
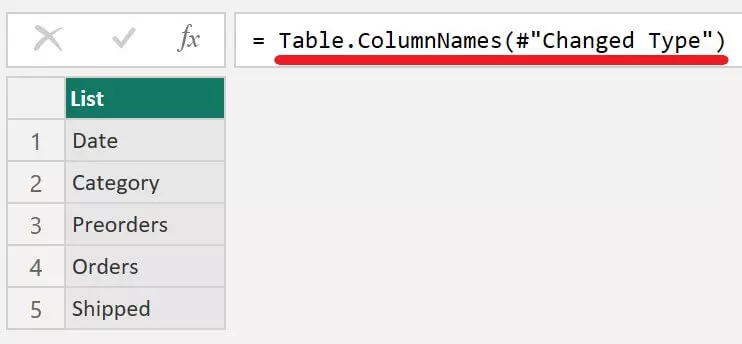
For example, in my query I would write:
= Table.ColumnNames(#"Changed Type")Once this is added, you can rename it to ‘Headers’ so it is clear what the step is for. See below.

Doing this will produce a list of the column names from the query in the previous step.
Here is what it looks like using our example data:
Step 3 (Optional): Add Headers to Replace Value code
Next, you replace values as shown in step 1, but we amend the code to include the Headers we have just created.
After you have selected the columns and replaced values, edit the code by replacing the column names with the word Headers.
= Table.ReplaceValue(#"Changed Type",null,0,Replacer.ReplaceValue,Headers)This will mean that you find and replace values in all columns listed in your Headers step. Therefore, when additional columns are added to your data source, they will automatically be picked up here and used in the Replace Values step.
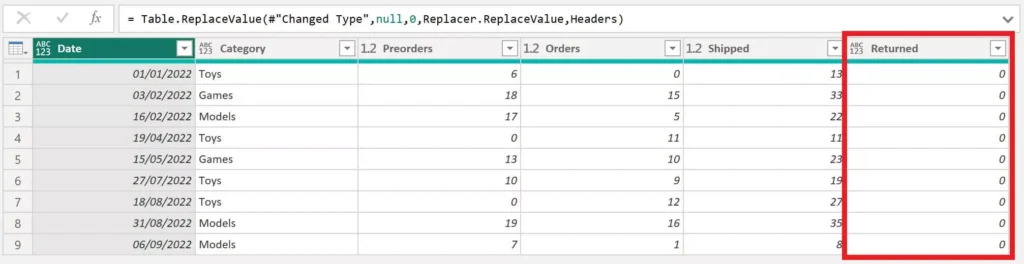
To show this in action, I have added a new column to the original data source in Excel, as below. There are no values in this column and would show as ‘null’ in Power Query.

When we refresh our query, the new column is picked up and the null values are replaced with zeros automatically.
Method 2: Unpivot other columns, replace values and pivot columns
This second method of replacing values in multiple columns in power query is more advanced than the first.
However, it will allow you to replace multiple values in multiple columns, rather than just one.
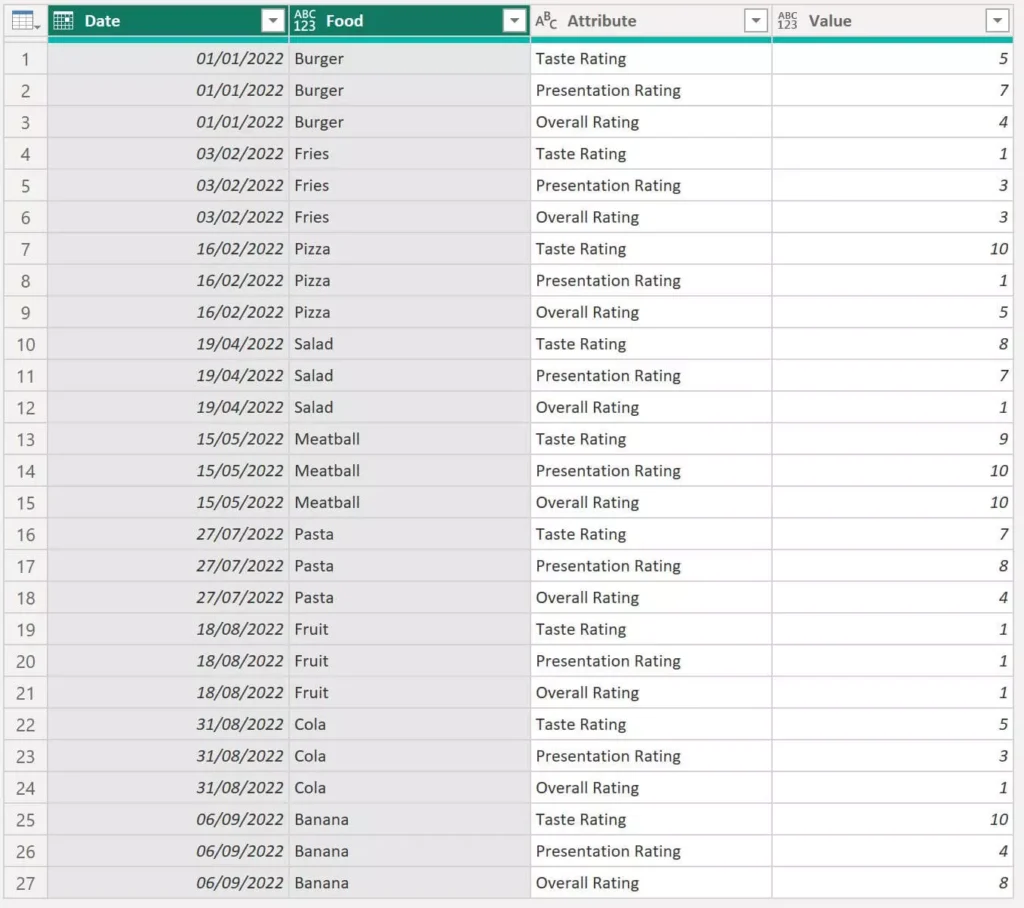
Here is the example data we will be using:

It is fictional food review data where each item is given a score out of ten based on taste, presentation, and overall.
However, there have been some typos, where items have received a score more than ten.
We want to replace any value over ten, with a ten.
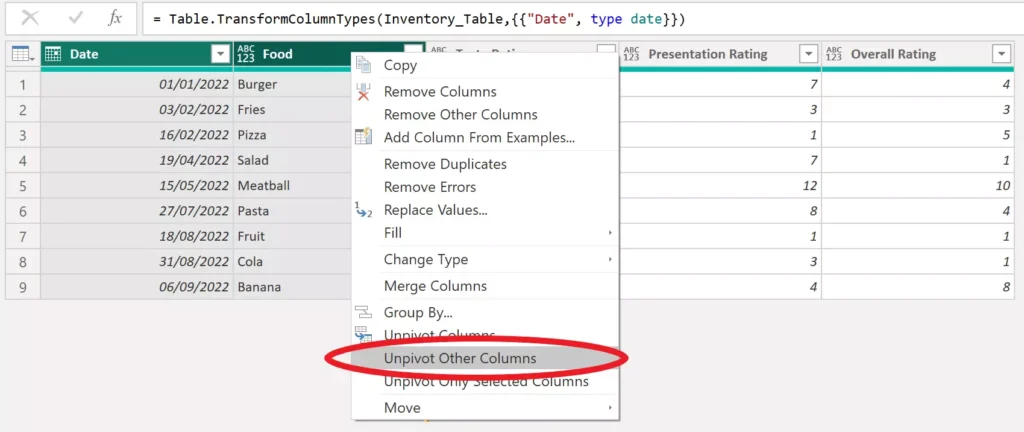
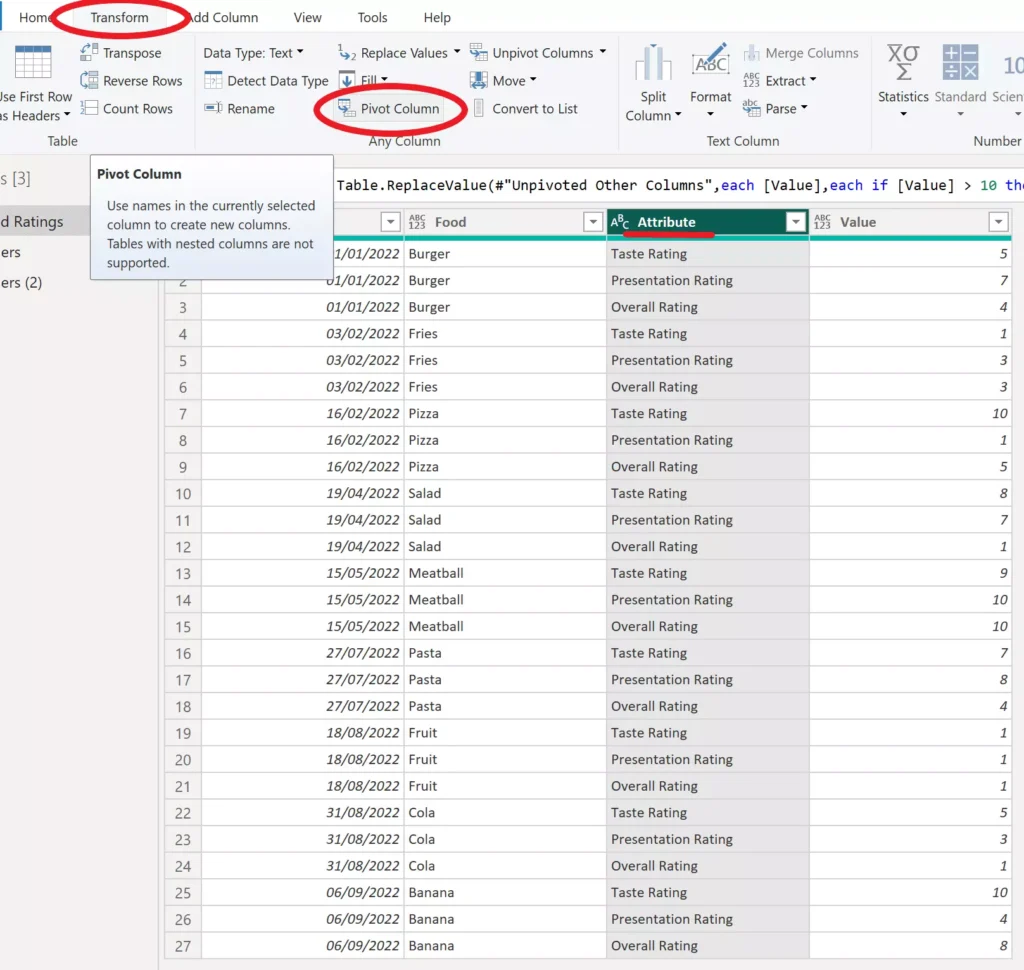
Step 1: Highlight and unpivot other columns
First, we need to unpivot columns that we want to find and replace values in.
Highlight the columns we are not replacing values in, right click and select ‘Unpivot Other Columns’.
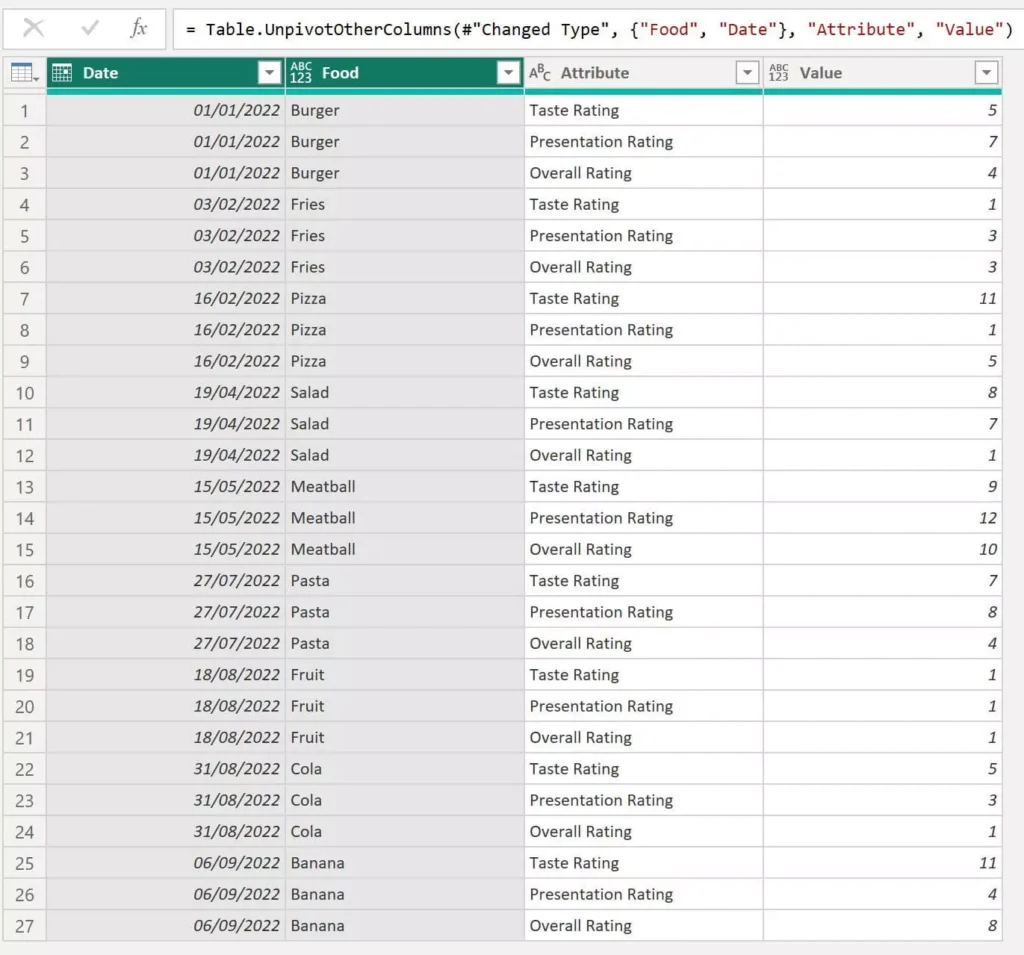
Your query should look something like this when it is done, with Attribute and Value columns.
Step 2: Replace values using IF statement
Next, we want to find and replace values.
To do this, use an if statement as shown in our other article on how to find and replace multiple values.
In this example, the M code will look like this:
= Table.ReplaceValue(#"Unpivoted Other Columns",each [Value],each if [Value] > 10 then 10 else [Value],Replacer.ReplaceValue,{"Value"})Your query should now have replaced values in the Value column.
As you can see below in our example, no value is above 10.
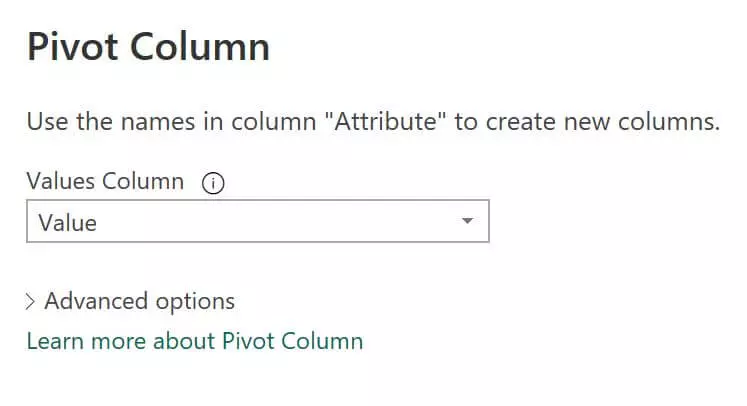
Step 3: Pivot attribute and value columns
The last step is to pivot your Attribute column.
To do this, select the Attribute column, go to Transform in the top ribbon, and click ‘Pivot Column’.
Then, when asked for the Values Column, select the ‘Value’ as below.
Your data will now appear with the original columns, with values replaced in them all. See below.

Note: This may cause the data types in your columns to revert back to original data, so please be aware of this.
You can create a new step and use the function Value.ReplaceType to restore data types from a previous step if needed.
Thank you so much! The Headers list steps were really helpful to me. Genius!
Thank you. Your feedback is appreciated!