In this article we will show you two methods for finding and replacing multiple values in Power Query, depending on your data and circumstances.
The first method we share can find and replace values in one step using an IF statement.
The second method uses a separate query and a custom column with List.Accumulate to dynamically find and replace values that can be added to and updated easily.
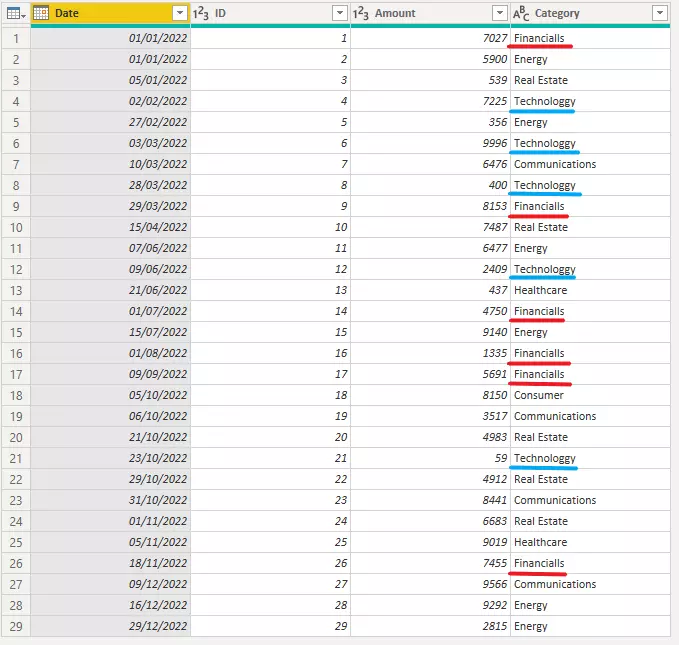
In this example, I have some fictional sales data.
We want to find and replace values in the last column, ‘Category’, where two categories have been misspelt, as underlined in red and blue.
There are two methods that I will share with you to replace multiple values in Power Query:
Method 1 replaces values in one step using an IF statement. It changes the original column and replaces values there.
This method is best if you know that the number of values you want to find and replace will not change.
It is also best when the number of items you want to find and replace is not too high (less than 10 instances).
Method 2 replaces values using a custom column to replace values. This means you will keep your original column the same, and the new one you create will have the replaced values.
It is best if you expect the number of values you want to find and replace to change at some point in the future (more instances added over time).
It is also best if you have a lot of values to find and replace (more than 10 instances).
Method 1: Use replace values and IF statement
In this first method, rather than performing the traditional ‘replace values’ step for each misspelt category, we will replace both in one step.
Replacing multiple values in Power Query in one step is useful if you have more than one replacement to make.
It will help you save time and also mean you don’t have unnecessary extra steps in your query.
In this example, I am replacing just two values so that I can demonstrate it more easily.
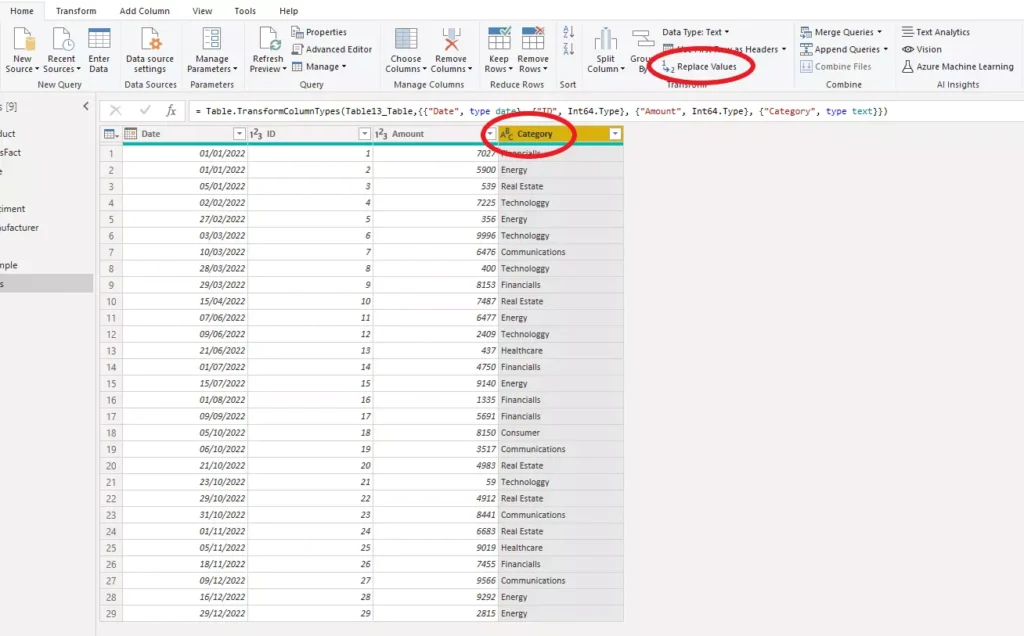
Step 1: Click on the column you want to find and replace values in and click Replace Values
Firstly, you need to open the table in Power Query and click on the column header that you want to find and replace values in.
Next, click ‘Replace Values’ which is in the Home ribbon at the top.
See image below.
Step 2: Enter two letters to find and replace to add applied step
After completing step one, a box will appear that asks you what value you want to find and what you want to replace it with.
Rather than adding the actual replacements you want to make, simply put a random letter in each field.
In my example below I entered ‘y’ and ‘z’.
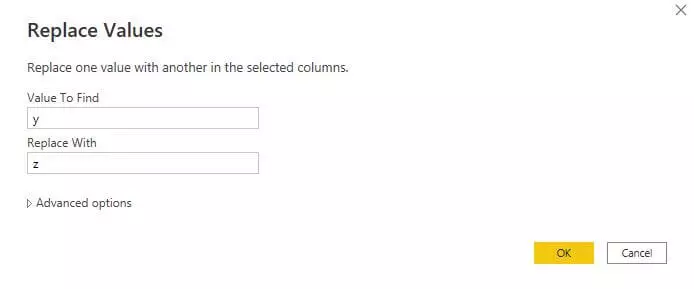
We do this to create an applied step that we can now edit.
See image below.
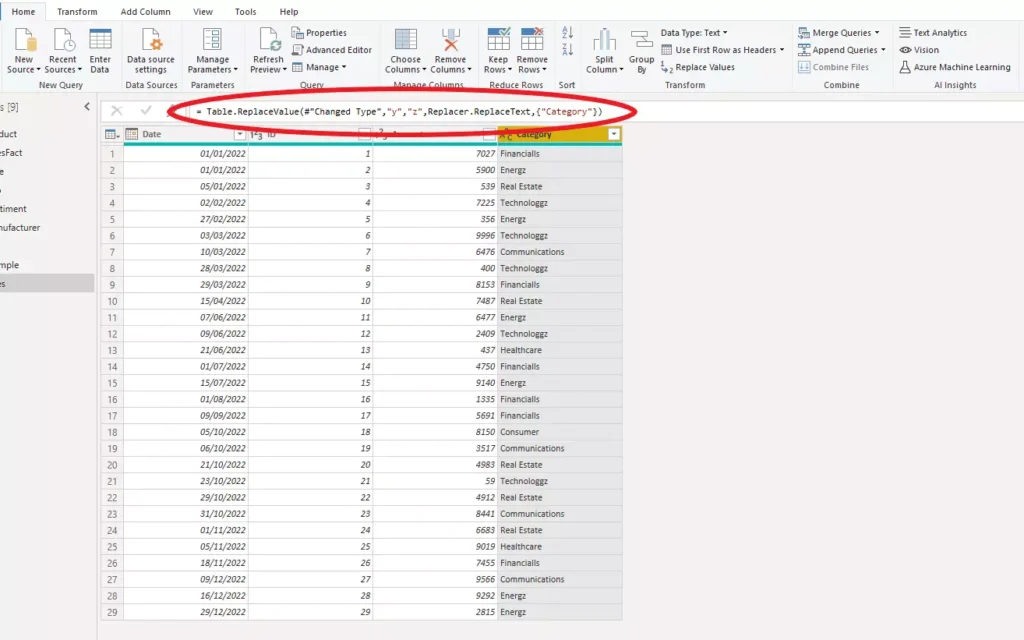
The formula highlighted in red should read as below:

Note: You can also achieve this step by adding a step and typing the formula in step 3 yourself.
Step 3: Add conditional statement to query
Now we edit the formula to add the values we want to find and replace.
Click on the formula to edit it.
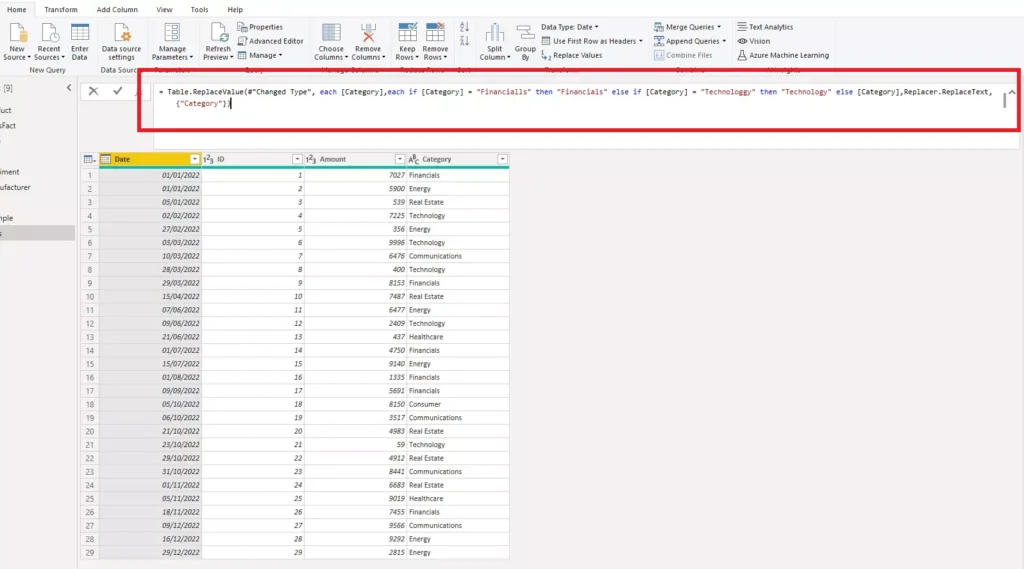

For the value you are finding, type:
each [column header name]In this case we have replaced “y” with
each [Category].For the values you are replacing, type:
each if [column header name] = "value to find" then "value to replace" else if [column header name] = "value to find" then "value to replace" else [column header name]In this case we have replaced “z” with
each if [Category] = "Financialls" then "Financials" else if [Category] = "Technologgy" then "Technology" else [Category]Keep adding to the conditional IF statement if you have more values that you want to find and replace.
This is not always practical if you have many values to find and replace, or if you keep having to add values to find and replace.
This second method below could be a better solution for you if either of these is the case.
Method 2: Create a custom column with List.Accumulate
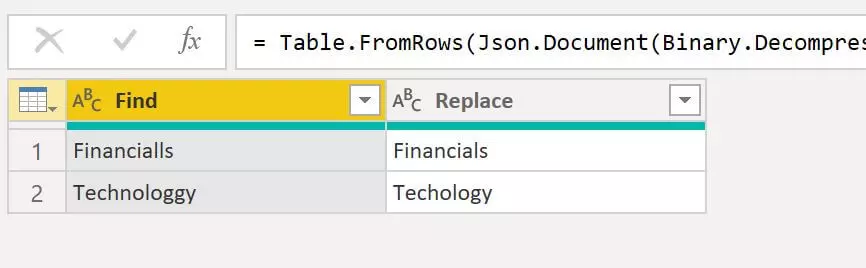
Step 1: Create a separate table for your find and replace values
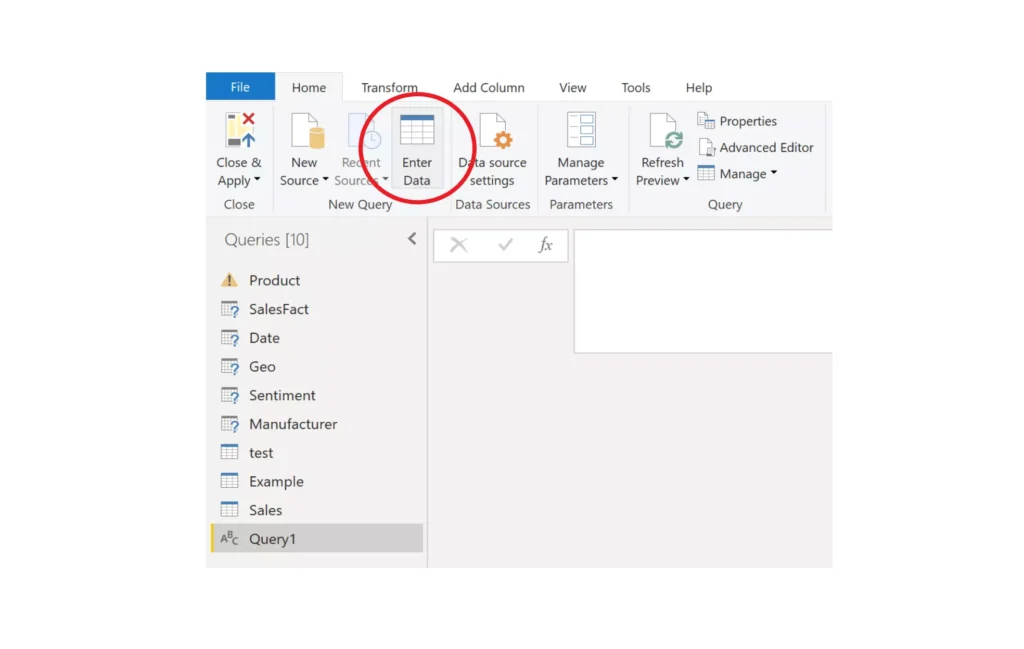
Firstly you need to create a new query for the table of values to find and replace.
You can do this by navigating to New Source and choosing Blank Query.
Note: There are other options you can use other than Blank Query that we will explain later.
Next, click Enter Data as circled below.
You can now add two columns, “Find” and “Replace” to the table, along with the values you want.
See example below.
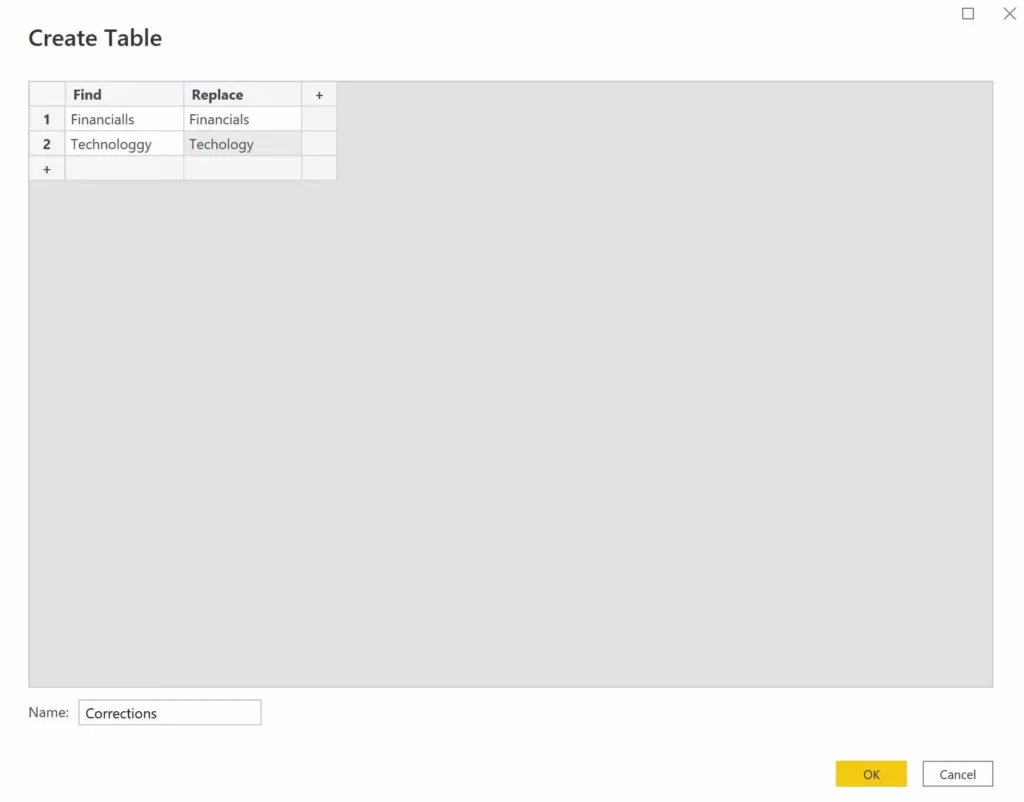
Once you have done this, the table should look like the below image, with your own values to find and replace.
Another option for this step, rather than use a blank table and entering the values in to Power Query, you get data from an excel workbook, for example.
This excel document can then be added to if you discover more values that you want to find and replace in your query.
If you are creating this for a team then members can add to the excel document rather than having to add in Power Query.
Using an excel workbook for this step can be beneficial if you have many values to find and replace too.
Step 2: Add a custom column with List.Accumulate
Next, you want to navigate back to your original table that has the column you want to find and replace values in.
Then click on the ‘Add Column’ ribbon at the top of the screen (as underlined in red below) and then click ‘Custom Column (as circled in red below).
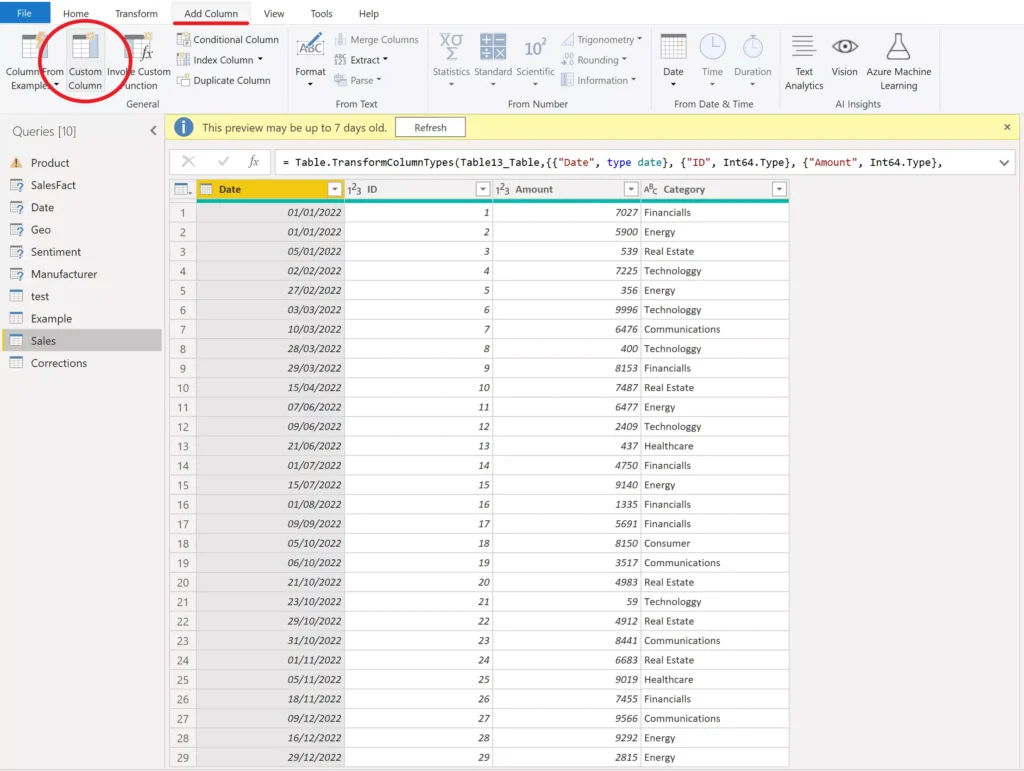
When the pop-up appears, give the column an appropriate name and then add the custom formula as explained below.
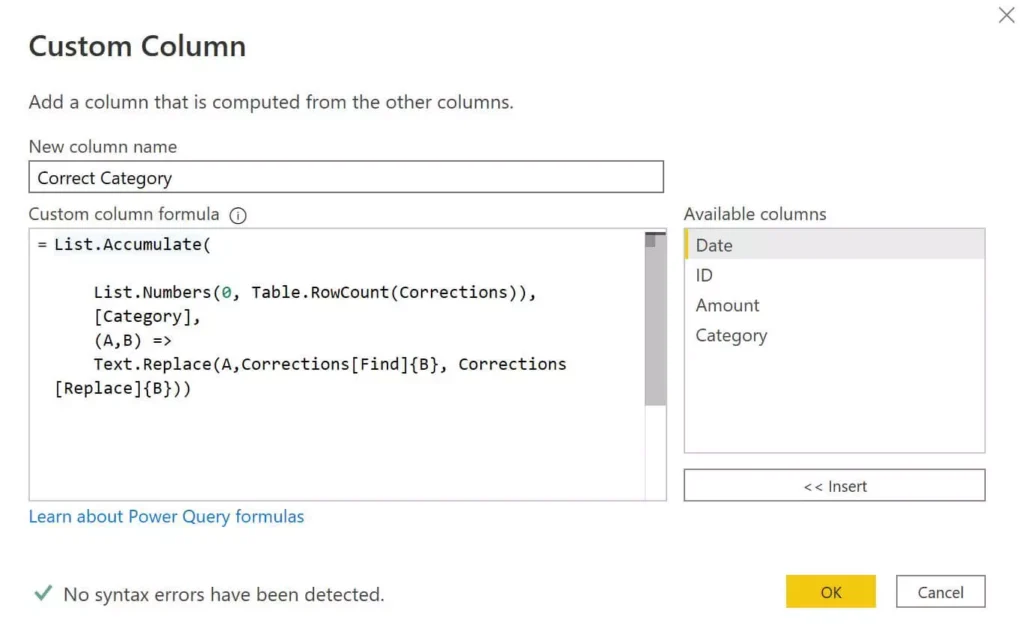
The formula uses the following queries and column names that you can swap to your own:
- Corrections = Name of the query you have added in step 1 that contains find and replace values
- Category = Name of column in original query that contains values you want to find and replace values in
- Find = Name of first column in Corrections query
- Replace = Name of second column in Corrections query
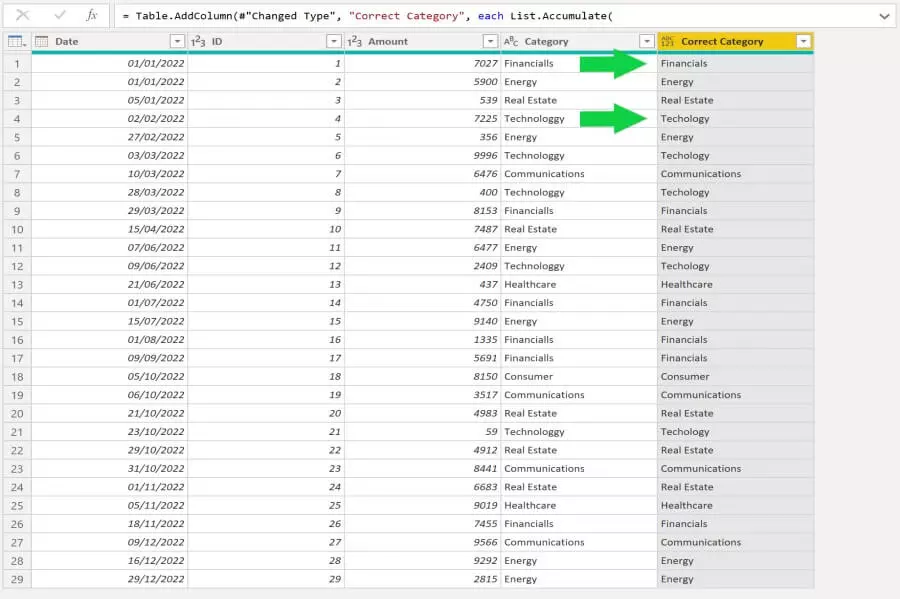
List.Accumulate(

    List.Numbers(0, Table.RowCount(Corrections)),
    [Category],
    (A,B) =>
    Text.Replace(A,Corrections[Find]{B}, Corrections[Replace]{B}))
See the image below for the result after adding the custom column.